Better Modulation Configurations for Synths of Self

While more prominently discussed in electronic music spheres, I would like to submit that modulation is relevant even if you’re primarily working with sound traversing air and hitting microphones. If you’re using a DAW, you’re extremely likely to find yourself automating parameters. Modulation can be thought of as automation on cruise control; it happens on its own and it keeps going.

Like any synth junkie, I regard modulation as a close friend. Like many other humans that make a living primarily through use of a computer, my wrists implore I employ the use of a mouse and keyboard as efficiently as possible. The synthesist in me takes this view on automation: could I do this with modulation instead? (That way I don’t have to draw it…)

I find myself creating with audio samples brought in from unrelated contexts all the time. Nuanced automation is an invaluable tool to massage the materials into fitting form. What is nuanced automation? That is hard to say in a blanket statement, but I think its safe to assume that it typically has a more complex shape than a triangle or trapezoid. Even if the complexity is arbitrary, it can still be effective in adding interest.

left: an ok starting point // right: more nuanced complex shape that has the same idea but feels more organic in context (an illusion, perhaps?!)

In the interest of saving my wrists (and time), pairing modulation with automation is a powerful move. Whether in radical or very subtle doses, modulation can turn an (easy to draw) triangle or trapezoid automation into something more compelling. I use Live’s MIDI LFO or the modulation CV tools in every single project I work on for this purpose, but I wish this workflow was portable to other DAWs. Furthermore, the modular synthesist in me aches for complex modulation signals such as the mixing of two LFO’s together.

A slow sine wave LFO mixed with an attenuated faster sine wave LFO. Combining modulation signals (or modulating a modulation signal!) is possible in some DAW’s but often a cumbersome process.

Developing my own plugins was an opportunity to employ the modulation capabilities I wish every plugin had. My goal with the Modulation Tab was to have the ability to quickly set up modulation of the plugin’s parameters if you want to, but have it out of the way unobtrusively if you aren’t interested.

My current iteration of Modulation Tab promotes mixing of synced and free running LFO’s

For this modulation tab I was also seeking the “right amount of complexity.” Admittedly favoring the perspective of a modulation junkie, the current version employs two modulation signals that can be crossfaded between. Its a pet peeve of mine when time based parameters give you a choice of sync’d or free rate values, but you can’t have both. With a modulation instance always running for both options, I found this configuration to be a quick path to the nuanced modulation I often wish for (i.e. mostly synced but a touch of free running modulation mixed in for variation).

I am by no means claiming this is the de facto “ideal modulation configuration,” but I think it’s a good step. One modulation source is great. Two is my favorite. For future iterations, I’d like to explore the ability to add or subtract modulation instances / sources.

New Synths of Self Plugins!

Synths of Self is back with two new plugins, Shave N Fade and Later Gator!

Since releasing Less2 , I lived out of a van with my family traveling extensively, recorded a lot of natural sounds, broke my collar bone in Utah, and completed a C++ Certificate program with the University of Washington on my laptop in the front passenger seat of the van. Why we did all of that (at the same time) is beyond the scope of this post, but within said scope is the conclusion that I’ve had a lot of perspective shifts and learned a ton about C++. 

With access to only a field recorder, a laptop, and headphones for about a year, I experienced a very productive focus when following the impulse to create music. I thoroughly enjoyed this refresh and have since been less enthusiastic when making music with my moderately verbose synth / eurorack / drum collection. It’s not that I don’t like using those tools, but there’s inevitably less immediacy and a nagging sense of “I should use this instrument because I have it,” which doesn’t always serve the music best.

I am very well aquatinted with the reality that making music solely on a computer is issue-ridden as well. One of the main problems with using a DAW is the limitless possibility one needs to a mental fortress to not be overtaken by. I know many amazing musicians and producers that detest this nature of DAW life and fully embrace the limitations of other dedicated hardware to find freedom in their process. I love this thinking and find the notion romantic. However, as a person that makes music professionally in many contexts, I find that leaving the efficiency of the computer behind is simply not a realistic option. 

In the in-the-box battlefield, I have found that many 3rd party plugins only make matters worse. Whether too many features, too many presets, or too ambitious a use case set, audio plugins have the dark power to weaponize the infinite possibility vibe-killer. But it doesn’t have to be this way!

Plugins I love and use regularly often do one and only one thing. Or perhaps there’s just an easy to find knob or two that I gravitate towards manipulating. 

When traveling, the gear I missed most was actually my eurorack system, but specifically the modulation workflow it offers. Without that, I rediscovered / found new appreciation for plugins that have modulation capability at their core. Just like in the eurorack domain, I found I could utilize modulation of simple parameters with simple sounds and get where I wanted to go with less effects and less cruft. 

Simplicity of use paired with accessible modulation is the ethos of my next wave of Synths of Self plugins. Shave N Fade features one primary slider to interact with. Later Gator has two (but these are linked by default, lol!). Beyond that there is massive modulation potential and powerful response adjustment. These can be simple at first, but are also capable of complexity if you want to venture there. 

Shave N Fade’s drop-down Modulation window is there when you want it, but tucks out of the way otherwise.

This preset (made by my daughter) features a complex resulting sound when traversed :)

Knowing what I know now about object-oriented design, I made these relatively simple audio plugins with scalability / maintainability in mind. Some core features such as Curve Adjusters and a Modulation Window I made to be easily reusable for future projects. This will save me a ton of time in the future, but the upfront commitment to design these plugins in this way was substantial. Although I wrote all the code, this was a massive team effort in every other way. I couldn’t have reached a viable product stage without so much patience and help from my family and friends.

I’m looking forward to tackling more ideas on my ever-expanding list of future projects, as well as collaborating with others!


Disintegration Loops in Ableton Live

I’ve been fascinated with disintegrating tape loops ever since I stumbled upon the environmental work, Surface Tension. It includes a recording of a tape loop that was soaked in the River Lea as it is disintegrating. I found the aesthetic and implications really wonderful and have been fascinated with the process of disintegrating tape loops ever since.

Being a bit scrappy (not wanting to buy a tape machine and old tape to ruin), I’ve been on a bit of a mission to recreate this process by other means. I’ve tried a lot of different variations, many of which have been rather cumbersome, and have recently settled with an Ableton Live setup that uses CV Tools to apply noise to pitch and volume of a delay with near infinite feedback. The iterative process of chipping away “randomly” at pitch and amplitude mimics the disintegration sound I find so arresting. An exciting perk of doing this is software is the ability to send audio into the disintegration process freely, and even treat it as an effects send in a production.

You can download the latest version of this disintegration set up here. You’ll need Ableton Live 10 and CV Tools installed.

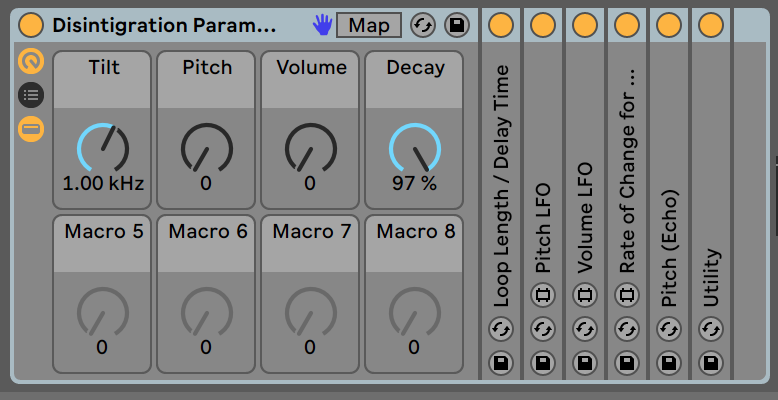
I set up four macro controls to provide streamlined controls for the rate and amount of disintegration, providing easy control for the style of disintegration you desire.

Screen Shot 2020-01-21 at 10.16.07 AM.png

I want to thank Corey Wood, who freely suggested an ingenious change to a previous version of this set up that simplified the audio flow of this set up.

Hope you enjoy!

MIDI Sample and Hold Max For Live Devices

From the depths of Sensory Percussion, Ableton, and a plethora of synthesizers I surface to share these MIDI Sample and Hold Max For Live Devices!

I’ve gotten hooked on S&H as a means of performing melodic sequences from the drums. S&H allows me to rearrange melodic content as I wish to present it in real time while still maintaining the concrete elements of a composition. S&H is usually used for sampling random values (i.e. the circuit samples noise and holds the value until sampling again), but in the modular synth domain I discovered the power of using S&H to sample sequences. I wanted that workflow in software as well, so I decided to make M4L devices to implement S&H with MIDI pitch information.

Download the MIDI Sample and Hold Max For Live Devices here.

Download the manual here.

Please get in touch with any questions, thoughts, feedback, etc.


All Waterfalls

As I write this, I realize I failed to write on this blog about “Bow + Arrow”, an EP I released in July. You can read all about it in this interview I did with Sunhouse.

This blog post is about my newest project in the works, entitled “Alternative Forests.” I'm reworking “Piano Forest” (a solo piano album I put out in 2015) for Sensory Percussion and electronics. Using the masters from the original record as the primary sampling material, I’m exploring a unique pallet of sounds that result from using Sensory Percussion with such delicate melodic material.

I tried playing four of the new songs live last week at a really crappy venue whose PA didn’t put out frequencies below 10k, which is another funny story unto itself. Despite the circumstances, it was a really fun night of trying new material and doing some improv with friends. Of the four new songs, “All Waterfalls” (a reworking of “Waterfall”) really stood out to me as being where I want it to be for the record, so I decided to go ahead and record it.

At my show I was using three drums to play the song, but almost all of the action was on just one drum. I had the somewhat eccentric idea that if I could squeeze everything onto one drum, I could record it outside in the woods using my smaller audio interface that can be bus powered off my laptop. So that’s exactly what I did.

Staying true to my convictions about playing electronic music truly live without supplemental tracks, all the sounds are played in real time. There is a lot of automation in the Ableton set, which mainly serves the role of bringing different sounds in and out over the course of the piece. I like to use this approach for the more concrete elements of the composition so that I can utilize all of the expressive potential of Sensory Percussion for actual expressivity and not just to make the composition function.

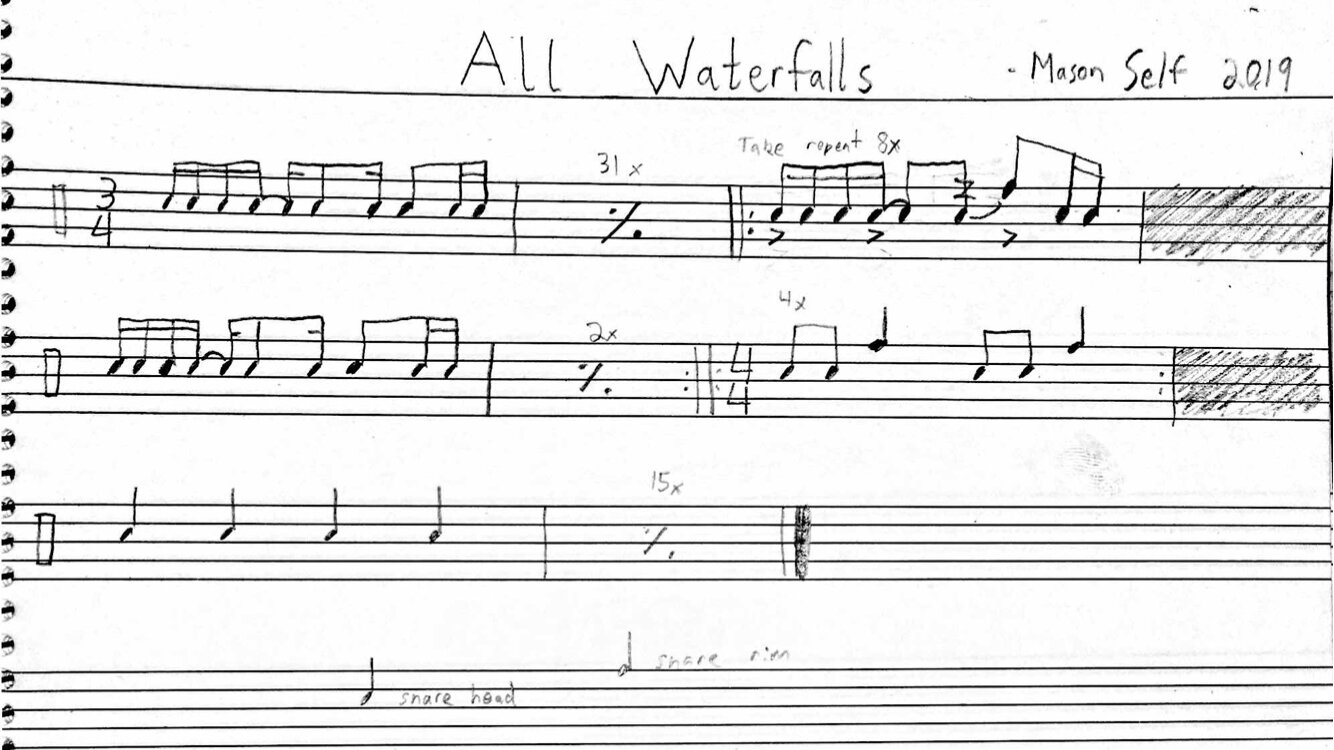
Instead of explaining all the details of how this works, I thought I would just make the Ableton Set and .sps file available to anyone interested in trying it out. You’ll need Sensory Percussion, Ableton Live 10 Suite, and CV Tools installed. Click here to download.

If you want to dive deeper in this workflow, consider taking a skype lesson with me.

One fun thing I employed in this piece was my latest Max For Live device, the CC to Pitch Bend Converter V0. It simply provides a few parameters that can be mapped to CC’s to control MIDI pitch bend. I made this explicitly to use Sensory Percussion controllers to do tap into pitch bend messages in a logical way. In “All Waterfalls” I’m using a speed controller to do a nice pitch bend on the bass. The device is included in the download, feel free to exploit it however you can dream up.

Screen Shot 2019-10-04 at 12.23.45 PM.png
IMG_924FE60C561F-1.jpeg

How to use the OP-1 Envelope Follower

Here is a brief explanation of how to tap into the incredibly underutilized OP-1 envelope follower.

First of all, what is an envelope follower? In short, it’s using the amplitude of a signal as a modulation source. For more detailed info, check out this article.

envolope.png

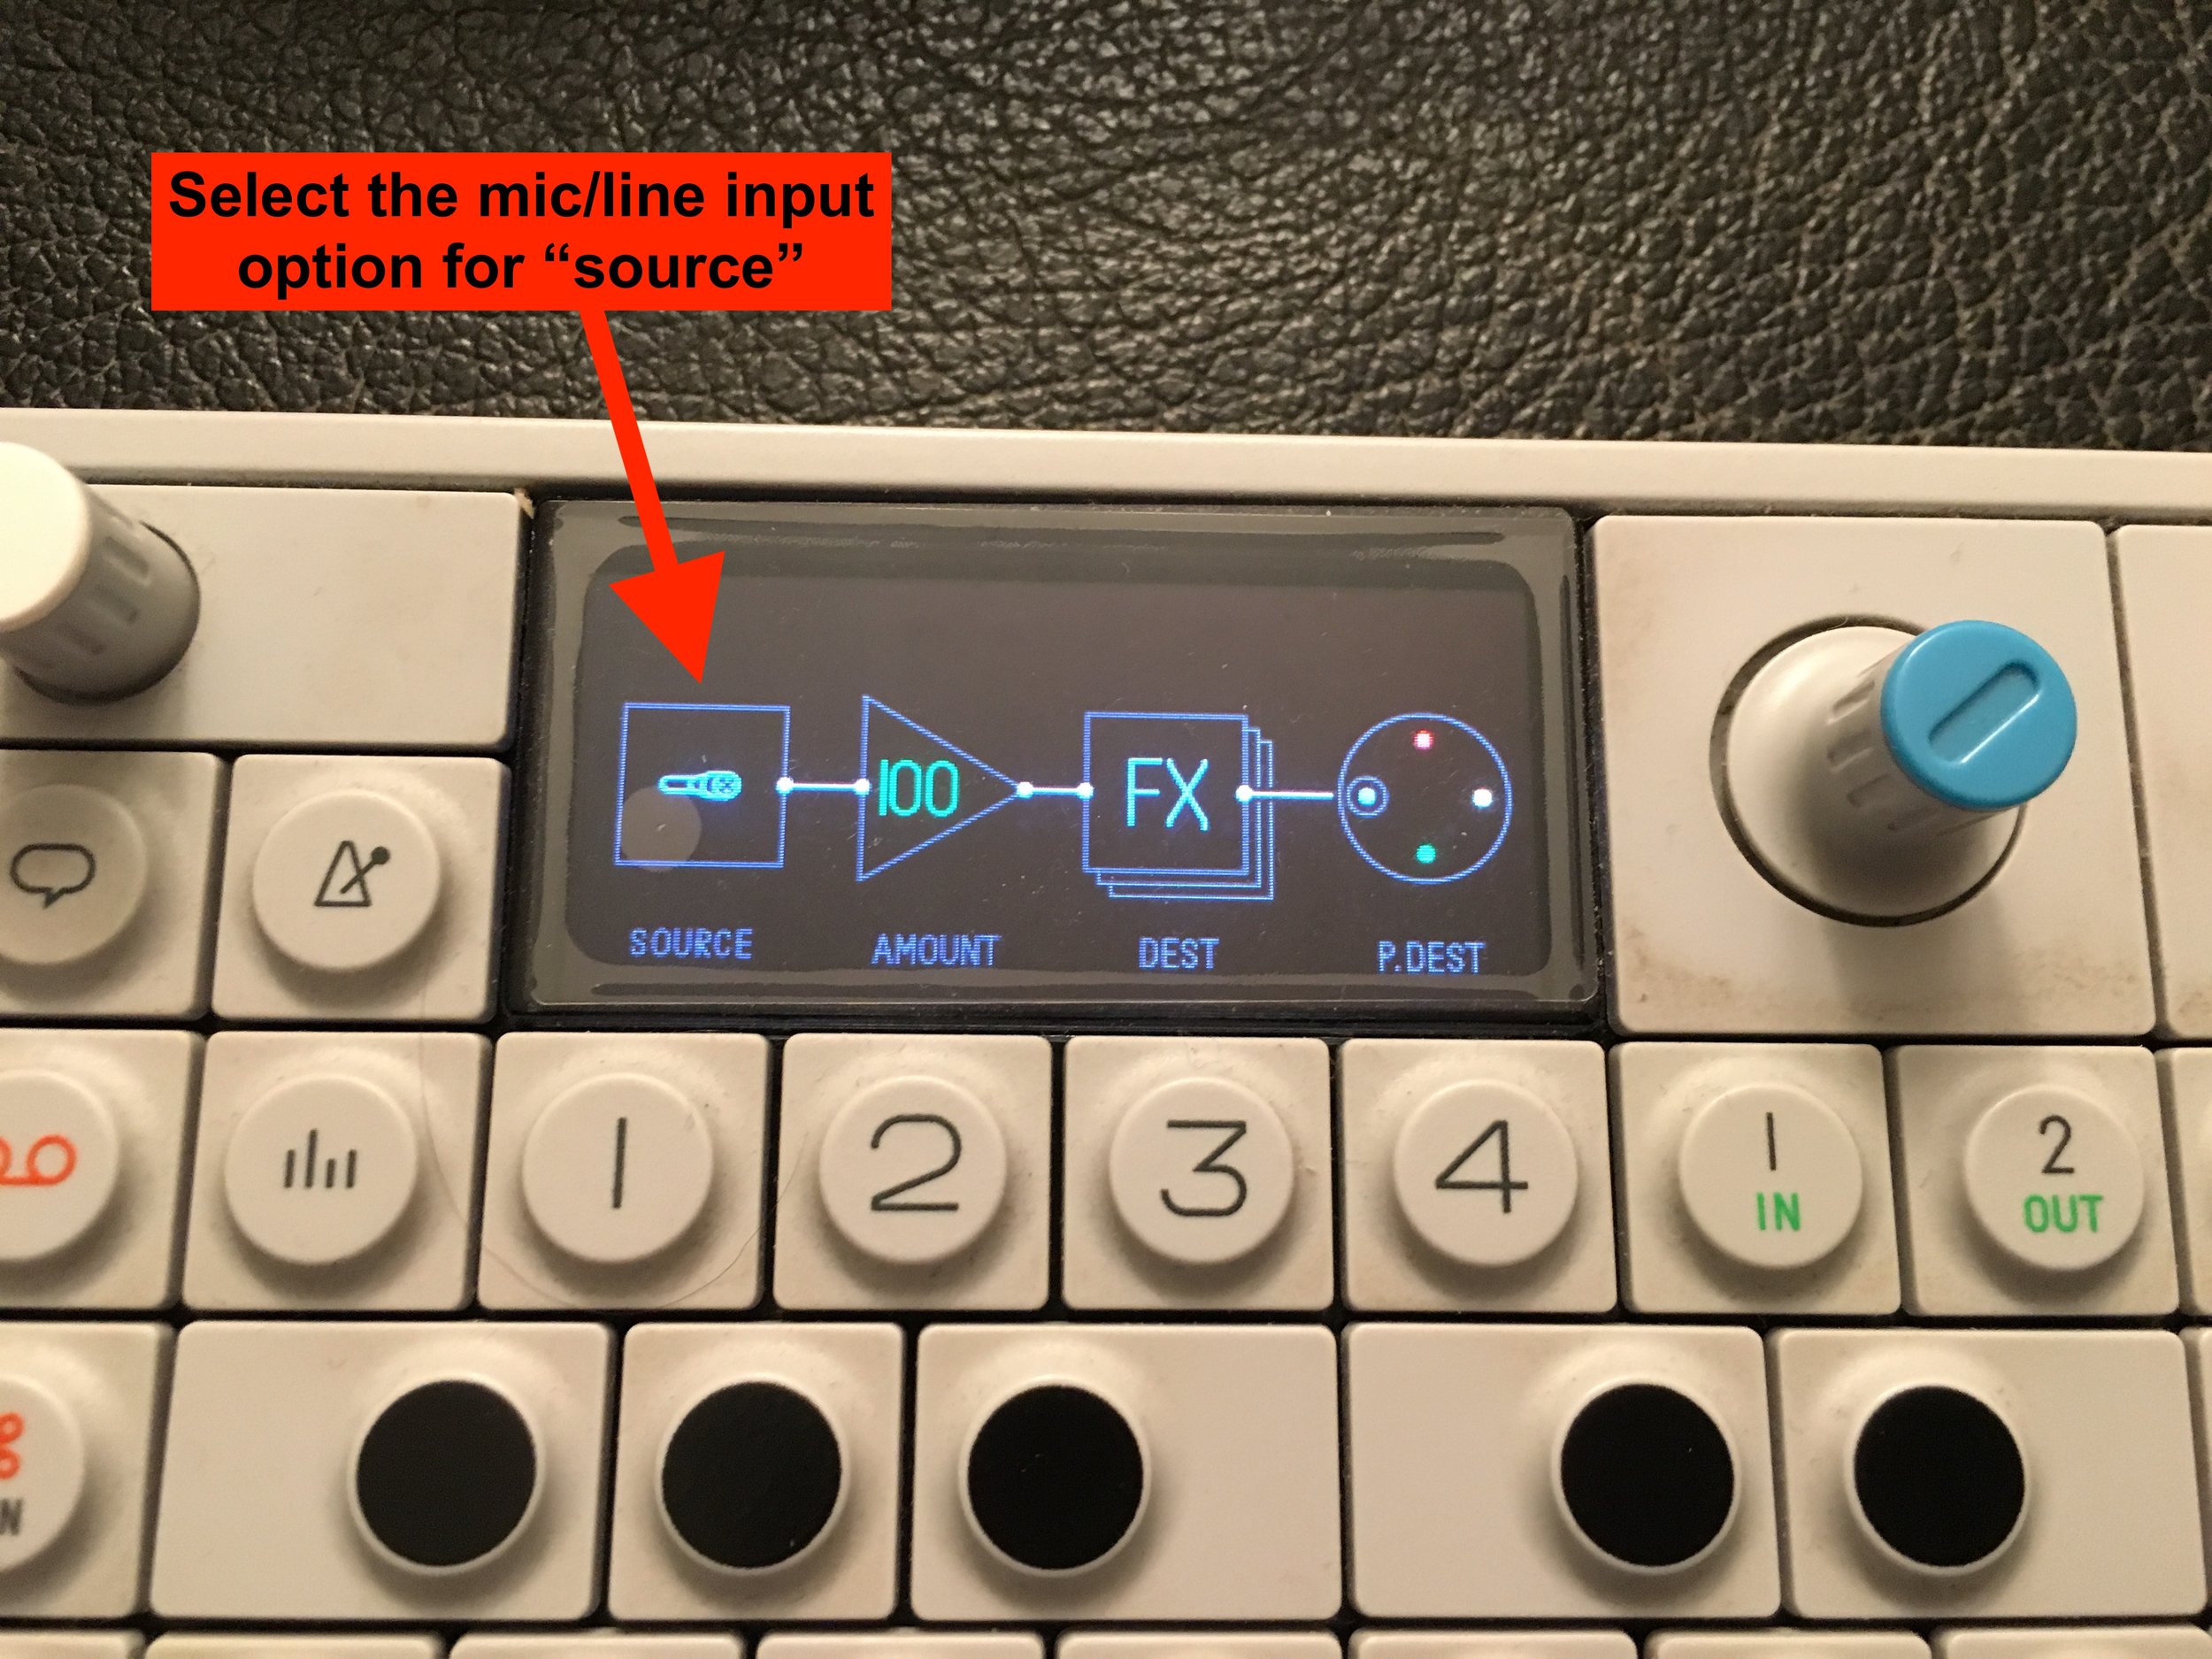
Here’s where to find it on the OP-1: in synth mode press shift 4. Select the “Element” LFO

IMG_8844.JPG
*I’ve had better success boosting the signal before inputting into the OP-1 to get the full range of modulation.

*I’ve had better success boosting the signal before inputting into the OP-1 to get the full range of modulation.

You can assign this modulation source to many places as determined by this LFO window. Scale the signal (+/-) with green knob, set the destination with white, set the parameter (color coded) with orange. In the case of this picture, I’m modulating the “frequency” parameter on the punch effect. You may find that certain destinations make more sense than others, depending on the modulation material. Filter cutoff is always a safe bet!

IMG_8842.JPG

I’d love to hear what you do with the OP envelope follower!

Some examples utilizing the envelope follower:


Moog Model D iOS App

I had the pleasure of making music in this video to demo the Moog Model D iOS app.

It was really fun to recreate classic stylings the Minimoog marked history with. I must say that the app is quite good; it exceeded my expectations. I’m no purist with analog synths, but spending so much time with this app definitely defogged my understanding of the reality of iOS music even more. The iPad is a very expressive medium. Add that to the unparalleled convenience of toting an iPad anywhere and its easy to see where the future lies.

I had met a few people from Moog before, but getting to know the crew that envisioned this video concept was quite a treat. Even them taking over our house for a couple days of shooting was no bother. What a great company - both the people and the synths.